Thursday, October 29, 2015

Cute kids!
What fun we had at the art table today! 
I loved paper dolls as a kid and now as 
an adult I love paper doll crafts!  lakeshorelearning.com
 had these cute die-cut kid shapes on sale so of course I
 had to buy them. Using scrapbook paper I cut out lots of pants
shirts and dresses for the kiddos to use to dress their
friends. They were so excited to pick out kid shapes to 
represent themselves, their friends and their siblings. 
The fun continued as they chose clothes
 buttons and wiggly eyes for their kids.
We did lots of role play with our kid creations
sharing ideas on ways to treat each other with
kindness and love.Great learning, great fun!
Supplies needed
kids shapes
pre cut clothes
glue sticks
buttons
 wiggly eyes


Tuesday, October 20, 2015

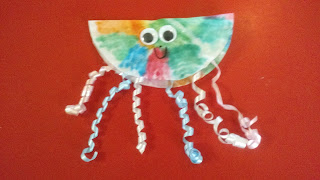
Jellyfish
One of my favorite art activities to do with my kiddos
is done with coffee filters or paper towels and
washable markers. I love the tie-dye 
look when the project is finished! Today
we created tie-dye jelly fish. Using a coffee
 filter folded  in half  the kids colored all
over it with washable markers. I laid them on
a piece of newspaper for easy cleanup. Next
is the kids favorite part, they spray water all
over their coloring and watch the colors bleed
together. What gorgeous jelly fish! But they still need a face
 and tentacles. My gift wrap box had lots of ribbons and bows
so I cut up a bunch of ribbons for the legs,used big
googly eyes and let my little ones draw a mouth.
Be sure and let the coffee filters dry before adding the
tentacles,eyes and mouth. Our art table was swimming
in colorful jellyfish!
Supplies needed
coffee filters
washable markers
spray bottles
ribbon pieces
googly eyes
white glue

Tuesday, October 13, 2015

Insects
What an adorable collection of insects my 
kiddos made today. I just love art from the heart
where each child's creativity flows freely. No two
insects look alike. One of my kiddos favorite part
of collaging and building with assorted materials
is getting to use their own glue bottle. Such a 
simple thing that brings so many smiles! The 
only rule they have is no big puddles of glue please! 
They had shapes, colored sticks, pom poms, buttons, beans,
colored pasta and wiggly eyes to chose from. Kaylee 
 Lily and Melanie were adamant that their insect have 
6 legs like real insects. The boys didn't care, they
wanted to have the fastest insects so they added 
lots of legs! Its so fun to just sit and observe kids 
at the art table. Their conversations are so sweet . 
They finished up by giving their insects a name. 
Such fun for the kiddos and the teacher!
Supplies needed
card stock paper
assorted shapes for the insects body
assorted collage materials
white glue 

Monday, October 5, 2015


Hats
My kiddos love making hats. Today's hat came
out so cute, it is one of my favorites! Each of the kiddos thought it was so
 funny to be covered up with the newsprint while we taped around
their head! So much giggling! After their head was
measured and taped, we took the shell of the hat off their wiggly
 heads and  rolled up around the edges of
the newsprint to make a brim for the hat. Masking tape held
the uncooperative pieces of the brim in place. Then it
was time for painting! Colorful hats filled the art table!
Lily decided the hats needed some pom poms on top.What a great idea!
A little tacky glue and a hand full of pom poms added
extra cuteness to our already cute hats!
Then it was time for a hat parade!!! The kiddos were so excited
to show off their adorable hats to
the neighborhood!
Supplies needed
large easel size  newsprint (or newspaper will work)
masking tape
paint
paint brushes and paint pot
pom poms
tacky glue
FYI- each hat needs 3 pieces of newsprint or newspaper to
make it sturdy enough to paint.

Monday, September 28, 2015

 Glitter fun
My kiddos love glitter! It's sparkly, it's shiny and its so messy! 
It takes months to get glitter out of the carpet! So what do
 we do to make sparkly art from the heart? Glitter glue! Today glitter 
glue, golf  balls and a shallow box created gorgeous
 works of art. Golf ball painting is fun, it's mess free and it is such 
a joy for kids to do no matter how old they are. They get so excited as 
they roll the golf balls through the paint watching the colors mix as 
the golf balls make crazy designs all over their paper. 
 For a final touch I added our Bible focus
 to their masterpieces.
Supplies needed
shallow boxes
golf balls
glitter glue
white paper (I like card stock)
Just a FYI-- I like to put the glitter glue on the golf
 balls before the kids start painting.

Monday, September 21, 2015

Sparkly foil fish
Today we had such fun with foil, paint and glitter.
This week its all about the letter Ff. So whats more fun than painting
 on foil? Painting foil fish of course! The paint glides so
smoothly over the foil and its shiny. My kiddos love
creating shiny art. For a bit more sparkle
to our beautiful fish we added glitter while the paint
was still wet. I used small heavy duty paper plates for
each fish. Simply cut a small triangle out of the plate
and you have a mouth and a tail! Cover the plate and tail
with foil, tape the tail to the back of the fish and you
are ready for some beautiful art from the heart! Be
sure and have shallow boxes out to lay the fish in
for their sprinkle of glitter, that way the mess is all in the box!
Last the kids added a big googly eye. What a
a lovely school of rainbow fish we had!
Supplies needed
Paint
paint pots and brushes
heavy duty plates (I used dessert size)
heavy duty foil
glitter
 large googly eyes
tape for the tail
glue for the eye

Tuesday, September 15, 2015

God takes care of Elijah
One of the blessings in teaching young children
Bible stories is the way God uses the 
teaching to touch  my life and to remind
me of his promises and his constant presence.
Today the children learned that God was not only with
 Elijah, but also that Elijah trusted God and did what God 
told him to do. Before the kids came to the art table 
I went online printed and cut out a picture of Elijah.
Saran wrap became the river, the sandpaper became dry land.
Our ravens were black feathers. All the supplies were placed on the 
table so the kids could decide how they wanted  their  
picture to look. Art should have few rules, one of them being no two 
pictures have to look alike! The kiddos had fun with all the
 different textures of supplies they used to create their 
picture. Our collection of stories turned out to be 
a wonderful masterpiece!
Supplies needed
Blue construction paper
sand paper
saran wrap
a picture of Elijah
black feathers
orange paper for the birds beak
goggle eyes
small pieces of bread to put in the ravens beak.
white school glue


Thursday, September 3, 2015

Daniel in the lion's den.
It's letter Dd this week in preschool.We had such 
fun learning about how God was with Daniel
in the lion's den and how he is always with us as well.
Preschoolers love to paint, and here at Homespun we 
paint a lot! Today we started out with dot painters. 
They are such a great painting tool. Not just because
kids love to make dots all over their pictures, but also 
because they are not messy!  Dot painters can be bought
on amazon.com. I googled a  picture of Daniel and the lion's
den, shrank it down to fit on the paper plates and then the kiddo's
 dot painted the picture. We set our dot painted pictures aside
and got busy painting our lion's den. I used brown paint
with a little white glue added to it. Once the dens were painted
sand was sprinkled onto the wet paint. The glue
in the paint works well when using sand.
Finally Daniel and the lions were added to the den.
Our Bible story art came out great! The
parents love it when the kids bring home an
art project that they can tell a story with.
Supplies needed
A picture of Daniel and the lion's den (cut out)
paper plates (trim off the bottom)
Brown paint w/ white glue added
dot painters
sand 

Friday, August 28, 2015


Cupcakes!
Our cupcakes came out so cute, they looked
good enough to eat! I found the cute cupcake
template at todayinsecondgrade.blogspot.com
We started  out with cookie sheets, red and white  paint and
shaving cream. Finger painting is a great
sensory activity. Some kids will excitedly put
 both hands in the paint and get busy mixing the colors.
 Others are not so sure and use one hand or even just a finger
 to mix the paint. I like to use two colors that will blend into
a new color, that way we have added a little science
experiment to our fun art activity!
Adding shaving cream gives a little puff to the paint.
After the kiddos had finished finger painting I laid
the cupcake frosting cut-out on top of the tray of paint
 and pressed down gently. It's always such fun to see the kids
reaction to the print when the paper is lifted off
their painted tray. After washing up hands lots of sprinkles
 (colored dots) were added to the frosting. Last we glued the
 cupcake to the cupcake paper. What a yummy batch
of cupcakes we had  at Homespun Daycare!
Supplies needed
cupcake template copied on card stock
 washable paint
shaving cream (optional)
cookie sheets
dots


Monday, August 24, 2015

Bb is for Bible
Bb is for Bible, boat and best friend! Today we 
learned about all three. The kids started out
painting a storm using bouncy balls in a shallow box.
It's lots of fun watching the balls roll through the paint
 leaving  quite a storm on the light blue paper. Just place the paper
in a shallow box. Add 3 or 4 bouncing balls to the box and
 squirt some paint on them. I used blue and white paint. The kids tip the box
back and forth and roll the balls creating a great storm picture. While the
stormy pictures dried the boat building began. I pre cut
 the boats, sails and  a simple Jesus figure and taped a craft sick
 to the back of the boat. The kiddos added a sail and Jesus
 to the boat. To make our stormy clouds  they gently
 pressed cotton balls into gray paint and glued them on.
 Last we added shiny pipe cleaners for lightning. The
kiddos enjoyed retelling the Bible story as
they built their pictures. I was so  blessed hearing
the story in their own words and reminding
them that Jesus is their best friend and is always
with them!
Supplies needed
light blue construction paper
blue gray and white paint
shallow boxes
(I paint with 2 kids at a time so I had 2 boxes)
super balls
pre cut boat, Jesus figure, and sail
craft sticks
cotton balls
shiny pipe cleaners

Wednesday, August 19, 2015

                                                                     Bb is for blue bird
I saw this cute bird craft as I was searching for
letter Bb ideas. As a home based daycare my kids
stay with me for at least 3 years.That means I am always
 looking for new ideas each year as I introduce the 
alphabet. My kiddos get such joy out  of 
turning their letters into crafts. The bird was 
an all time favorite. Not only that but  it's a 
simple craft with little prep work. Just cut out an upper 
case letter B, a beak and legs, add a googly eye and
 feathers and your kiddos are ready to create! The kids
had fun sorting thru the box of feathers. We had lots giggles 
 as they tickled their faces with them. Lily loved 
the soft fluffy purple feathers. 
Homespun had a flock of beautiful birds!
Supplies needed
Pre cut letter B
pre cut beaks and feet
googly eyes
feathers
white glue

Thursday, August 13, 2015

Aa is for apples
It was a great first week of preschool
here at Homespun. The kiddos had so much fun with
our apple tree craft. Tearing and crunching lots of
green tissue was the first step. Tearing paper is
a great fine motor skill, and a favorite of the kids.
It was just as fun for them to crunch up
the green tissue and glue it onto pre cut circles.
Our final step was adding pom pom apples. Each child
 picked out 5 apples to glue onto their tress. Once
 dried the beautiful tree tops were put onto toilet paper rolls.
Just make a slit on the sides of the toilet paper roll and
 slip the tree top in. So cute!
Supplies needed 
circles cut out tag board
green tissue
red pom poms
white glue
toilet paper rolls

Friday, August 7, 2015

Helping hands
Today we did stain glass art. It's a fun activity and the kids loved
seeing their hands hanging on the arcadia door! Our lesson 
focus was being a good helper. Its never to early to 
 start planting seeds of compassion in the hearts of kids.
After reading the Good Samaritan we got busy with our art
activity. You will need to cut up  tissue paper into short strips. 
The contact paper is easier for the kids to use if you cut a 
rectangle shape (large enough  for the child's hand to fit on for 
tracing), and peel half the backing off. Then let the 
fun begin! The kiddos loved the sticky paper and 
enjoyed picking colors to stick on it. Once they have
covered the paper unpeel the other side and carefully 
fold it over on top of the tissue paper. As I traced each little
hand I asked how they can be a helper. They had so many cute
 reply's! Aiden said he is going to stay here
 with grandma and be my helper forever! 
Supplies needed
tissue paper in assorted colors
clear contact paper
string for hanging the hands


Tuesday, August 4, 2015


Spray bottle art
Kids and spray bottles go to together
like peanut butter and jelly! And more fun yet
is liquid water color, a spray bottle 
and big paper! My kiddos loved spraying
their paper and watching the colors drip
down and blend into each other. They giggled
as they sprayed color on top of colors.
 Their excitement was contagious as they
 watched new colors appear."Red and blue makes purple
 Max shouted to his friends". And more giggles and 
 more sharing color experiments. 
Simple art is so fun for kids. There
 are few rules, few supplies and lots of 
opportunity for  creativity. 
Supplies needed
small spray bottles
liquid water color, dilute with water 
(available at www.discountschoolsupply)
easel and easel paper.

Thursday, July 23, 2015


Markers and cars
This was such a cute idea from Pinterest! My kiddos had such 
fun with markers taped to the back of vehicles.They each
 picked out two vehicles and two colors of markers. 
I taped the markers onto their cars, trucks and trains and 
they excitedly got busy driving their cars across
the paper. Be sure to take the lids off the markers before you
 tape them to the cars. Even little Lucy was thrilled with her 
rainbow road. Kaylee was sure to let her friends know
 there would be no speeding!  Such a simple activity with 
little preparation that the kids had such a great time with! 
Supplies needed
assorted vehicles
washable markers
masking tape
paper

Wednesday, July 22, 2015


Salt art
There is nothing more exciting when your a teacher than 
getting a bag of donations! Especially art donations!
In my bag of goodies I found  nice sturdy vehicle
 shapes. My kiddos had lots of fun decorating them with glue 
and colored salt.  Salt is cheap and easy to color. 
Just pour it in a bowl, add some Wilton color paste, stir and 
let it dry. I  color my salt the day ahead. The dollar store
 has these small  metal cake pans. They make a great work station
 for messy art projects. I covered  the vehicles with white school
 glue and the kids used their Q-tips to spread glue all over 
their vehicle shapes. Then they got busy picking their
 favorite colors of salt for their favorite vehicle. 
We had a rainbow assortment of cars, planes, trains and boats.
Supplies needed
Sturdy shapes. 
The shapes can be found at lakeshorelearning.com
colored salt
white school glue
shallow pans or boxes
Q-tips

Thursday, July 16, 2015


Baby Moses 

God is always with us was today's
Bible focus.The story of Moses is perfect for teaching about
 Gods  presence. From the time Moses was a baby all through his
  adulthood God was always right there with
him. I want the kids to know that He is also
right with us all the time. I had found some plastic pot
scrubbers at the dollar store and knew they would be fun
to paint with. Before we started I hot glued the pot scrubbers to
 the top of medicine bottles. These make great handles!
I then put different shades of blue paint on paper plates.
I added a plate of white paint so the kids could create shades
 of light blue and green paint for the reeds in the water. I found 
the colorful baby Moses at christianpreschoolprintables.com.
They were actually a file folder game, but worked great on
our Nile river. The pot scrubbers and paint created great rivers! 
After they had dried a bit the kids picked out a 
colorful Moses and glued him on. 
Supplies needed
plastic pot scrubbers
white construction paper
baby Moses printable's
paint & paper plates


Tuesday, July 14, 2015

Lots of little frogs!
We had lots of fun learning about frogs today!
The kids enjoyed the the book"Frogs" by Susan Canizares. 
It is one of Scholastic's science emergent readers with
 wonderful photographs of the life cycle of frogs. We 
also read "frogs lunch" by Dee Lillegard and sang
five green and speckled frogs. We had such a fun cirlcle time!
At the art table the kids sponge painted frog masks. I put out 
three diffrent shades of green paint and  sponge squares
 clipped onto clothes pins. I Made a  frog template, cut the
 masks out of card stock and taped a large craft stick to
 the back of the mask. When our masks were dried I
used a sharpie marker for the mouth and the kids
added precut black and white circles for the eyes
 and a red construction paper tongue. The kids were
so cute singing 5 green Speckled frogs
with their masks on.
Supplies needed
Pre cut frog masks
Pre cut black and white circles
Large craft sticks
Green paint
Sponge
glue

Friday, July 10, 2015

Obedience
Today's Bible story was Adam and Eve. How
beautiful life was for Adam and Eve living in a 
a gorgeous garden. That is until Eve listened to
a snake! I used today's Bible lesson to teach on 
obedience. So often in Preschool my kids blame their
disobedience on their friends. We talked about
making good choices. We then made snakes at the craft
table as a reminder to do the right thing. I found a
snake template  on a Google search and  printed it onto
card stock and then cut it out. The kids crunched up
colorful tissue paper squares and glued them onto the snake.
They then colored the snake's tongue and
added googly  eyes. We had a colorful collection
of snakes, and lots of new ideas on how to
make good choices.
Supplies needed
Snake template
tissue paper
googly eyes
glue

Tuesday, July 7, 2015

Monster art
Today we read the the book "There was 
an old monster"! by Rebecca, Adrian & Ed Emberley. 
With so many of the kids talking about monsters under their bed
and in their closet I thought we would read books that 
showed silly monsters doing silly things! I wanted the kids to 
know that monsters are just pretend. After our story we 
made puffy paint monsters. The kids had such fun with 
this art activity. The puffy paint puffs up after 30
seconds in the microwave. (I found the recipe at happyholligans.ca)
They were so intrigued when we put the monster in the microwave
 with what appeared to be just paint and they came out all puffy!
 I loved that the paint dried so quickly as other puffy paint takes 
quite a while to dry. The paint needs to be put on in blobs to puff up. 
I had the kids use a brush to dab the paint rather than spread it. 
The recipe was so simple. 1 Tbsp of self rising flour.( You can make 
your own self rising flour. Its one cup of flour, 1/2 teaspoon salt and 
1 1/2 teaspoon baking powder). 1 Tbsp salt, a bit of water and I used 
food coloring gel. Mix it until it's the consistency of yogurt. I cut 
the monsters out of card stock so they would hold up to the puffy paint. 
After they came out of the microwave the kids added wiggly eyes and teeth. 
We had the cutest school of little monsters!
Supplies needed
pre cut monsters
puffy paint
brushes
wiggly eye
white glue

Wednesday, July 1, 2015

Joseph 
Today we talked about getting along with 
others,showing love and not being jealous.
 What better Bible story than the story of Joseph 
to teach these concepts. I found some cute  paint
rollers at Walmart in the kids arts
and craft area. They made such fun designs as
 the kids rolled them in the paint and then
rolled them on their paper. My plan was to cut
coats out of the paper after the paint had dried, but the
 kids didn't want their colorful pictures cut. It is
"art from the heart"so that was fine with me!
I had also found a cute Joseph puppet for the kids to make on 
 making learning fun. I copied the Joseph picture on to tag
board, cut him and taped him to a craft stick.
The kids used  colored pencils to color their Joseph.
The well (which is a Styrofoam cup)they colored with
brown markers.They all had such fun playing with their
puppets.  
Supplies needed
fun paint rollers
washable paint
paper plates (for the paint)
paper
For the puppets
Instructions and patterns from
making learning fun
Styrofoam cups
craft sticks

Thursday, June 25, 2015

Let's build!
As my kitchen remodel continues we continued with
our construction theme here at Homespun daycare.
Today I set out all types of materials for the kids to build
with. They went to work building new kitchens.
I thought it was so cute they decided they would
 design their own  kitchens as the workmen noisily built my
 new kitchen.The kids loved the independence of using their own
 glue bottles as well as getting to choose what materials they
 wanted for their kitchens. They picked out shiny shapes, colored
 craft sticks, cut up straws and wooden circles. The kids
proudly displayed their kitchen designs for
the workmen to see.  
Supplies needed
Card-stock
Assorted building materials
White glue


Wednesday, June 24, 2015

Painting with tools
Our week here at Homespun Daycare
is going to be quite a challenge as I am getting 
a new kitchen. No better time than now to do
a construction theme with the kids. As the
workers began tearing down cupboards we learned
all about  the different type of tools they
would be using. The best part of  the day was
painting with tools. Kids and paint go
together like peanut butter and jelly! They
just love painting and had a great time making
prints with the tools and well as using them
like a paint brush.  I always use washable paint
when painting with the kids. You can find
paint as well as  great art and crafts supplies at
www.discountschoolsupply.comEach picture
 was a beautiful creation of art, no two alike.
That's my favorite part of art that no two pictures are the same.
Supplies needed
assorted tools for painting with
washable tempera paint
paper plates for paint
 large sheets of paper

Thursday, June 18, 2015


Father's Day
I saw this cute super hero craft on
pinterest. I knew as soon as I saw it, it would
be perfect for the front of our fathers day cards
we would be making in preschool this week. 
The kids used dot painters to paint the large
craft sticks. Dot painters can be found at amazon.com.
They are a great way to paint without a lot of mess.The
kids had such fun choosing what colors to use for their super dad.
We had so many colorful super hero's! The capes were
 glued onto the back of the craft stick. We then glued him down
onto the front of the card, added a mask and googly eyes. I had
made copies of  "Dad you're my super hero!" to add to the front
of the card. For the inside of the card we did a father's day
questionnaire. I love to ask the questions and hear the
 kids fill in the blanks. Their answers are so cute.
We had dad's who were 100 feet tall, and who
were very good at watching baseball.
You can google search "fathers day questionnaire" to
find one to print.  I reduced the size of my
 questionnaire to 80% and cut down 12x18" pieces
of construction paper to fit the questionnaire.
What fun the kids had making
crafts for dad!
Supplies needed
large craft sticks
dot painters (or tempera paint & brushes)
 pre-cut capes and masks
googly eyes
Dad you're my super hero print out
fathers day questionnaire print out
white glue

Wednesday, June 17, 2015

Painting with blocks
Today our preschool lesson was  Joshua and  the
 battle of Jericho.The kids  picked blocks from the 
block center to add to a plate of paint for building
the wall around Jericho. It was fun to see the how
each block would look on their paper. They 
enjoyed the activity so much that we had lots of 
pictures of Jericho's wall! Kids and paint go together! 
I had also google searched a coloring page 
of Joshua, printed it and cut it out to 
add to their art work. Once they were done
painting their walls I had them use dot 
painters to paint Joshua. They glued him onto 
the picture once it had dried. Dot painters are
a great addition to your art center. You can find 
them on Amazon as well as at Micheals. They
are fun for all ages and not very messy!
Supplies needed
a cut out picture of Joshua
blocks
paint & paper plates
white construction paper
dot painters

Thursday, June 11, 2015


Fun with shapes.
It was all about shapes today at preschool.
For art I traced 3 shapes onto white construction paper. 
 Carefully using an xacto knife and small 
scissors I cut the shapes out. To make our
project a bit more interesting and fun for kids I 
put a piece of double sided tape on 
the corners of the white paper and stuck it
on top of  a piece of black construction
paper. I had found some Sargent art brand of 
 florescent  tempera paint at Walmart.
It was a great price and a great quality
of paint. The kids had fun with the bight colors. 
I encouraged them to paint the entire piece of paper. 
Some of the kids carefully painted the shapes, then painted 
around the shapes. Other kids just busily painted the entire 
paper watching  the colors blend into each other. 
They were so excited when  I lifted the white paper and 
they saw the black paper with bright shapes.
Supplies needed
white construction paper
black construction paper
shape templates to trace
tempera paint
paint pots & brushes


Tuesday, June 9, 2015


Food kids
This week in preschool is all about food. We had a 
great time gluing food pictures onto pre-cut kids 
and making a healthy snack. My preschoolers are 
young, and not ready to cut pictures out
 so I cut out lots of food pictures for them. They
enjoyed  gluing their favorite food pictures
onto the kid cutouts. We talked  about healthy foods
and foods that are not so healthy as
 they glued their pictures.
 For their healthy snack I topped an apple ring with 
peanut butter  and let them chose toppings to 
sprinkle on. There was granola, yogurt raisins,
 chocolate chips, cranraisins and nuts to chose from.
Kids eat so much better when they 
get to help make their food. 
Supplies needed
kids cutouts
pictures of food from magazines
glue sticks
wiggly glues -optional
Snack supplies
apples cut into rings
peanut butter
assorted toppings
 

Thursday, June 4, 2015


Puffy paint ice cream
We are learning about summer this week at Homespun Daycare. 
What better craft to do on a hot Phoenix day 
 than an ice cream craft! I started out by 
making puffy paint. Just add equal parts of shaving cream
and white glue to a bowl and stir. I let each child 
pick a color they would like for the puffy paint. I use Wilton
food color paste.They are such bright colors and take just a 
tiny bit of color no matter what I am coloring.
I had made ahead an ice cream cone and added circles
 for the scoops of ice cream. (I use card stock for this project)
I also made ahead a bowl for ice cream. My kids
 love puffy paint so I knew they would want to make more
 that one ice cream picture. I put a couple blobs of puffy paint 
on their paper and gave them wooded craft spoons to spread the
 paint with. They loved swirling the spoons around in the thick
 paint, and watching the colors mix. They have just as much 
fun seeing the pictures after they have dried.The 
paint dries puffy and feels smooth. Some of the 
kids had such fun I put out sheets of card stock
and they made their own creations with the puffy paint.
Supplies needed
Shaving cream
white glue
bowls for mixing
 plastic or wooden spoons 
food coloring
  pre made ice cream cone pictures
or just card stock paper for painting on.


Tuesday, June 2, 2015

homespun kids: Swatting fly's!We had a beautiful May here in ph...

homespun kids:
Swatting fly's!
We had a beautiful May here in ph...
: Swatting fly's! We had a beautiful May here in phoenix, but June is here and so are the triple digits! So with summer upon us  ...

Swatting fly's!
We had a beautiful May here in phoenix, but June
is here and so are the triple digits! So with summer upon us
 I decided to do a summer theme this week in
preschool. The kids have been complaining
about the fly's outside bugging them.  Unfortunately our Phoenix heat
brings fly's! I decided it  would be fun to swat fly's today at the art table. First
 I Googled "fly templates to print"and made copies of fly's and cut them out.
 Then the kids glued the fly's onto the easel paper. I poured paint onto paper plates
and dipped the flyswatters in the paint and let the kids swat their fly's.
They had such fun swatting fly's! It got a bit messy, they loved swatting  those
fly's hard! Be sure to use a small amount of paint on
the flyswatters. The fly's show up  best with light colors of paint.
Supplies needed
fly pictures or stickers or hand draw fly's on the paper
easel paper or large sheets of paper
paper plates and washable paint
flyswatters ( I found mine at the Dollar Tree)

Thursday, May 28, 2015

Robots
The kids had such fun building  their robots today. 
I love to watch their creativity as they glue all 
sorts of odds and ends onto the robot. I started out
with some cardboard squares. I am a craft hoarder so 
I had pieces of light weight cardboard in my craft cupboard.
You can always just cut cereal boxes, or use poster board.
 I then cut toilet paper rolls in half for the body and cut  a smaller piece
for the head. (Cut them in half long ways). I covered them in foil
 and used the hot glue gun to attach them securely to the cardboard.
For this project we used tacky glue. Its a thick glue that holds
better than white glue. I gave the kids little cups of glue with a q-tip.
I then set out  cut up colored craft sticks,  cut up straws, small washers, 
nuts, bolts, buttons, and beads. The kids had such fun 
 with this craft, they even gave their robots names!
Supplies needed
cardboard
foil
toilet paper rolls
tacky glue & q tips
assorted "junk" for gluing onto robot


Tuesday, May 26, 2015


I'm back sharing more make it take it crafts!
These past six months have been a difficult season 
for me as well as for my family. In October my mother suffered a stroke. 
In November my mother in law suffered a stroke. My husband and I  
along with our siblings, their wives and our children were
 overcome with great sadness as we learned our mothers/grandmothers
 would not survive the massive strokes they had had. We gathered together 
and spent as much time as we could at our mothers side, soothing them, reminiscing 
about our childhood, and just being there capturing every moment with 
them we could. We were blessed to have them in the same care facility. 
Helen passed away Dec 5th. My mother Joyce passed away May 24th. 
It was bittersweet saying good bye to our mothers as 
God greeted them with open arms. We can smile through the
tears knowing a day will come when we will all be together once more.